 02-07-2008, 04:16 AM
|
#1 |
|
Full Access Member
Join Date: Sep 2006
Posts: 4
|
Hey everyone.
I'm creating a robot character who will have a ring around the bottom part of it. The ring will have an LED system that is going to reflect the mood of ther robot. Its default mode will a simple LED chaser runing around the ring. Has anyone created anything like this before or know how to create such an effect. I have an idea of how to do it but not sure how i would get it properly emitting light. Thanks in advancer for any help, Jamie below is a pic of the ring just to get the rough dimensions. It's only really goin to be the front edge thats visible and each poly is the equvielant to one LED section [EDIT] I just had a thought about this. This character design is still very much WIP. If possible i'd like to be able to replace the ring of single square lights with a scroling Dot Matrix. I realise this is more difficult to do but I think it would be much more effective and useful. The main thing is that it emits light as i plan on placing the charcter in the dark. 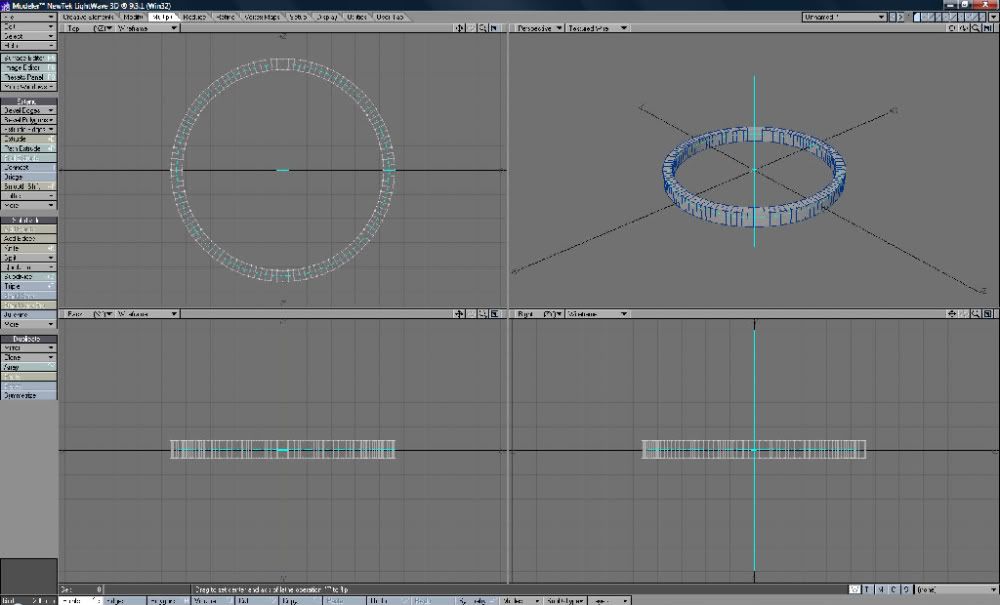 [EDIT] [EDIT]
Last edited by jimiman; 02-07-2008 at 05:49 AM. |

|

|
|
11-07-2008, 07:11 AM
|
#2 |
|
Full Access Member
Join Date: Jul 2004
Location: Northern Indiana
Posts: 243
|
How are things going? I haven't tried it yet but I had bought the IFW nodal and texture sets and there is a (I have to check for sure)a Shader called IFW2_Display. This might be what you're looking for.
Bad news is, I payed $99 US for the set. I don't think it is included in the free set included with v9.0. Or, if you just want lights, you can use the luminosity channel and envelope it to blink, brighten, and change color over time, then use channel follower to set a delay for each of the "following" lights, that would be a hassle if there are lots of additional lights though
__________________
Exploring the world around me |
|
|
|
|
11-07-2008, 10:29 AM
|
#3 |
|
Registered Member

Join Date: Jan 2005
Location: Somewhere... in 3D space
Posts: 153
|
As far as I understand... here's a few ideas:
1. For one row of polys, or LEDs, lighting one at a time, in a cycle (kinda like the KITT red lights in Knight Rider if you remember) Create the ring of polys. Create a cylindrical (on Y) texture map for the ring. You can also make LEDs from the polys by some beveling and subDs afterward. Just make sure you first make the map. It is going to be harder after you completed the modeling. And you can always remove polys from the map if you don't need them, but adding them is a bit more of a hassle.  As you can see here, the LED is made up of a few polys but in the UV map they're overlapping. That's ok, since we need them all to be lit or off. I'm going to use the normal polys in stead of the LEDs but it's the same thing with them.  So, you have the UV map. Now, make it fullscreen and take a screenshot of it. Go into your favorite image editing software and paste the screenshot. Over it or in a new layer create a grayscale image if you want the lights to gently become lit or a black and white if you want them to cycle between fully lit and off, like this: If you chose the black and white, make sure the white rectangle, which represents the poly/LED that is fully lit is exactly the size of one poly in the UV map or you'll get half lit polys/LEDs. It's better to add a separate surface to the ring than the rest of the robot so it can be controlled easier. In the Surface Editor for the ring, click the T next to Luminosity, the do as you can see in the image below. A higher u Cycle means a faster spinning texture. And there you have it.  2. If you need to have more control over the lights that are on. Still tweaking this, till now I have two ways. a) Go in top view, zoom in to just one poly and take a screenshot of the ring. In your image editing program make an image that will have white where the poly is and black everywhere else. Like this.  b) use the 1. to make the black and white 1 lit poly image (basically a white line on a black background, then cut half of the white line so you're left with this: Both techniques need some work in Layout so fire it up. Now create a NULL. I called mine LIGHT. This will be used to change the lit poly by rotating the image. In Surface editor, click the Luminosity T, make the layer an image layer, set the projection to planar and the image set to the half white line above. As reference object, select your NULL. Make sure the projection is on the Y axis, meaning from above. You'll need to tweak the size of the image, and the rotation. Mine is 90 degrees. You can also rotate the image in your editing software 90 degrees clock/anticlockwise, doesn't matter. Tweak some more and there you have it. All you'll need to do is animate the null and you'll make one poly light up while the others are off, spin it by a few degrees and another will be lit. The trick is to calculate the number of degrees to rotate the NULL so as to fully cover only one poly. A bit of math (a=360/number of polys) and there you have it. As soon as you set the first position and you're happy with it, you'll need to spin the NULL in increments of a to have a correct effect.  One thing I realize just now, you'll have to slightly spin the images in your editing program so they fit the poly exactly. So the line won't be straight down, but at a slight angle, not sure how much, you'll have to experiment yourself. If you want a LED matrix, just add more rings on top of this one, each with it's own light NULL and separate surface:  You can also have more lit LEDs on the same ring. Just add more layers with different reference NULLs, like this: (Here I used NULLS 3 and 4 in ring 1. You can create additional NULLs, and not use the ones of other rings for full control of what you want to write with the LEDs.) 
__________________
" ...'till the world burned!" |
|
|
|
|
12-07-2008, 03:40 AM
|
#4 |
|
Registered Member

Join Date: Jan 2007
Location: South Africa
Posts: 115
|
something else you may want to try is using luxigons- there are many tuts on the internet to teach you how- basically it allows you to transform pollys imported from modeler into rows and rows of lights in layout- you can use point lights to get the led effect, you can then group the lights together in the graph editor and switch them on and off/ fade them in and out using the graph editor
|
|
|
|
|
16-07-2008, 12:08 PM
|
#5 |
|
Registered Member
Join Date: Jun 2007
Location: Malaysia
Posts: 1
|
Dude! Please help me creating any effects in lightwave. Beside that, i also want you all to help me build a scene like the ocean scene. Please........
__________________
Orga |
|
|
|
|
16-07-2008, 07:56 PM
|
#6 |
|
Full Access Member
Join Date: Sep 2006
Posts: 4
|
Thanks for all the tips guys. Sorry i took so long to reply. been swamped with my other job and ther is no internet connection ther.
I'll give the ones i can do a go and let you know what the outcome is. Thanks again |
|
|
|
 |
 Similar Threads
|
||||
| Thread | Thread Starter | Forum | Replies | Last Post |
| The Ring of the Lord | Lexxiam | Finished Work | 6 | 03-08-2004 04:11 PM |
| Just a ring | Neochris | Finished Work | 23 | 08-01-2004 08:01 AM |
|

